Italian Rainbow Cookies

Having these cookies around the house just signifies Christmas to me. While you can buy them year round at any Italian bakery in NY, for my family they're a holiday treat. They’re that little extra that reminds me of sitting around with all the cousins, drinking homemade wine, and trying to unravel that red and white pastry box string while my mother yells at me. “You’re pulling too hard!” “You’re going to knot it!”
PS - I always made a huge knot and we’d have to cut it with scissors. This is a big deal in a Sicilian household, because your grandmother saves pastry box string in a drawer. That drawer also contains all the twist ties from every vegetable bag you’ve ever brought home from the grocery store, and every rubber band you’ve ever seen, ever. Allora.
Like the pignoli cookies, these are now cookies that I can’t get on the West coast, and despite my searching and asking lots of people, apparently there isn’t an Italian bakery (that I’ve found) in the entire area of Seattle. (What the fuck, Seattle?) I also can’t find a Jewish bakery, either, and this is something I complain to my husband about at least twice a week, and we’re not even Jewish. I just feel that if I was able to find several Jewish and Italian bakeries sprinkled across Phoenix, then finding them in Seattle should be no problem. If you know of any, please tell me about them.
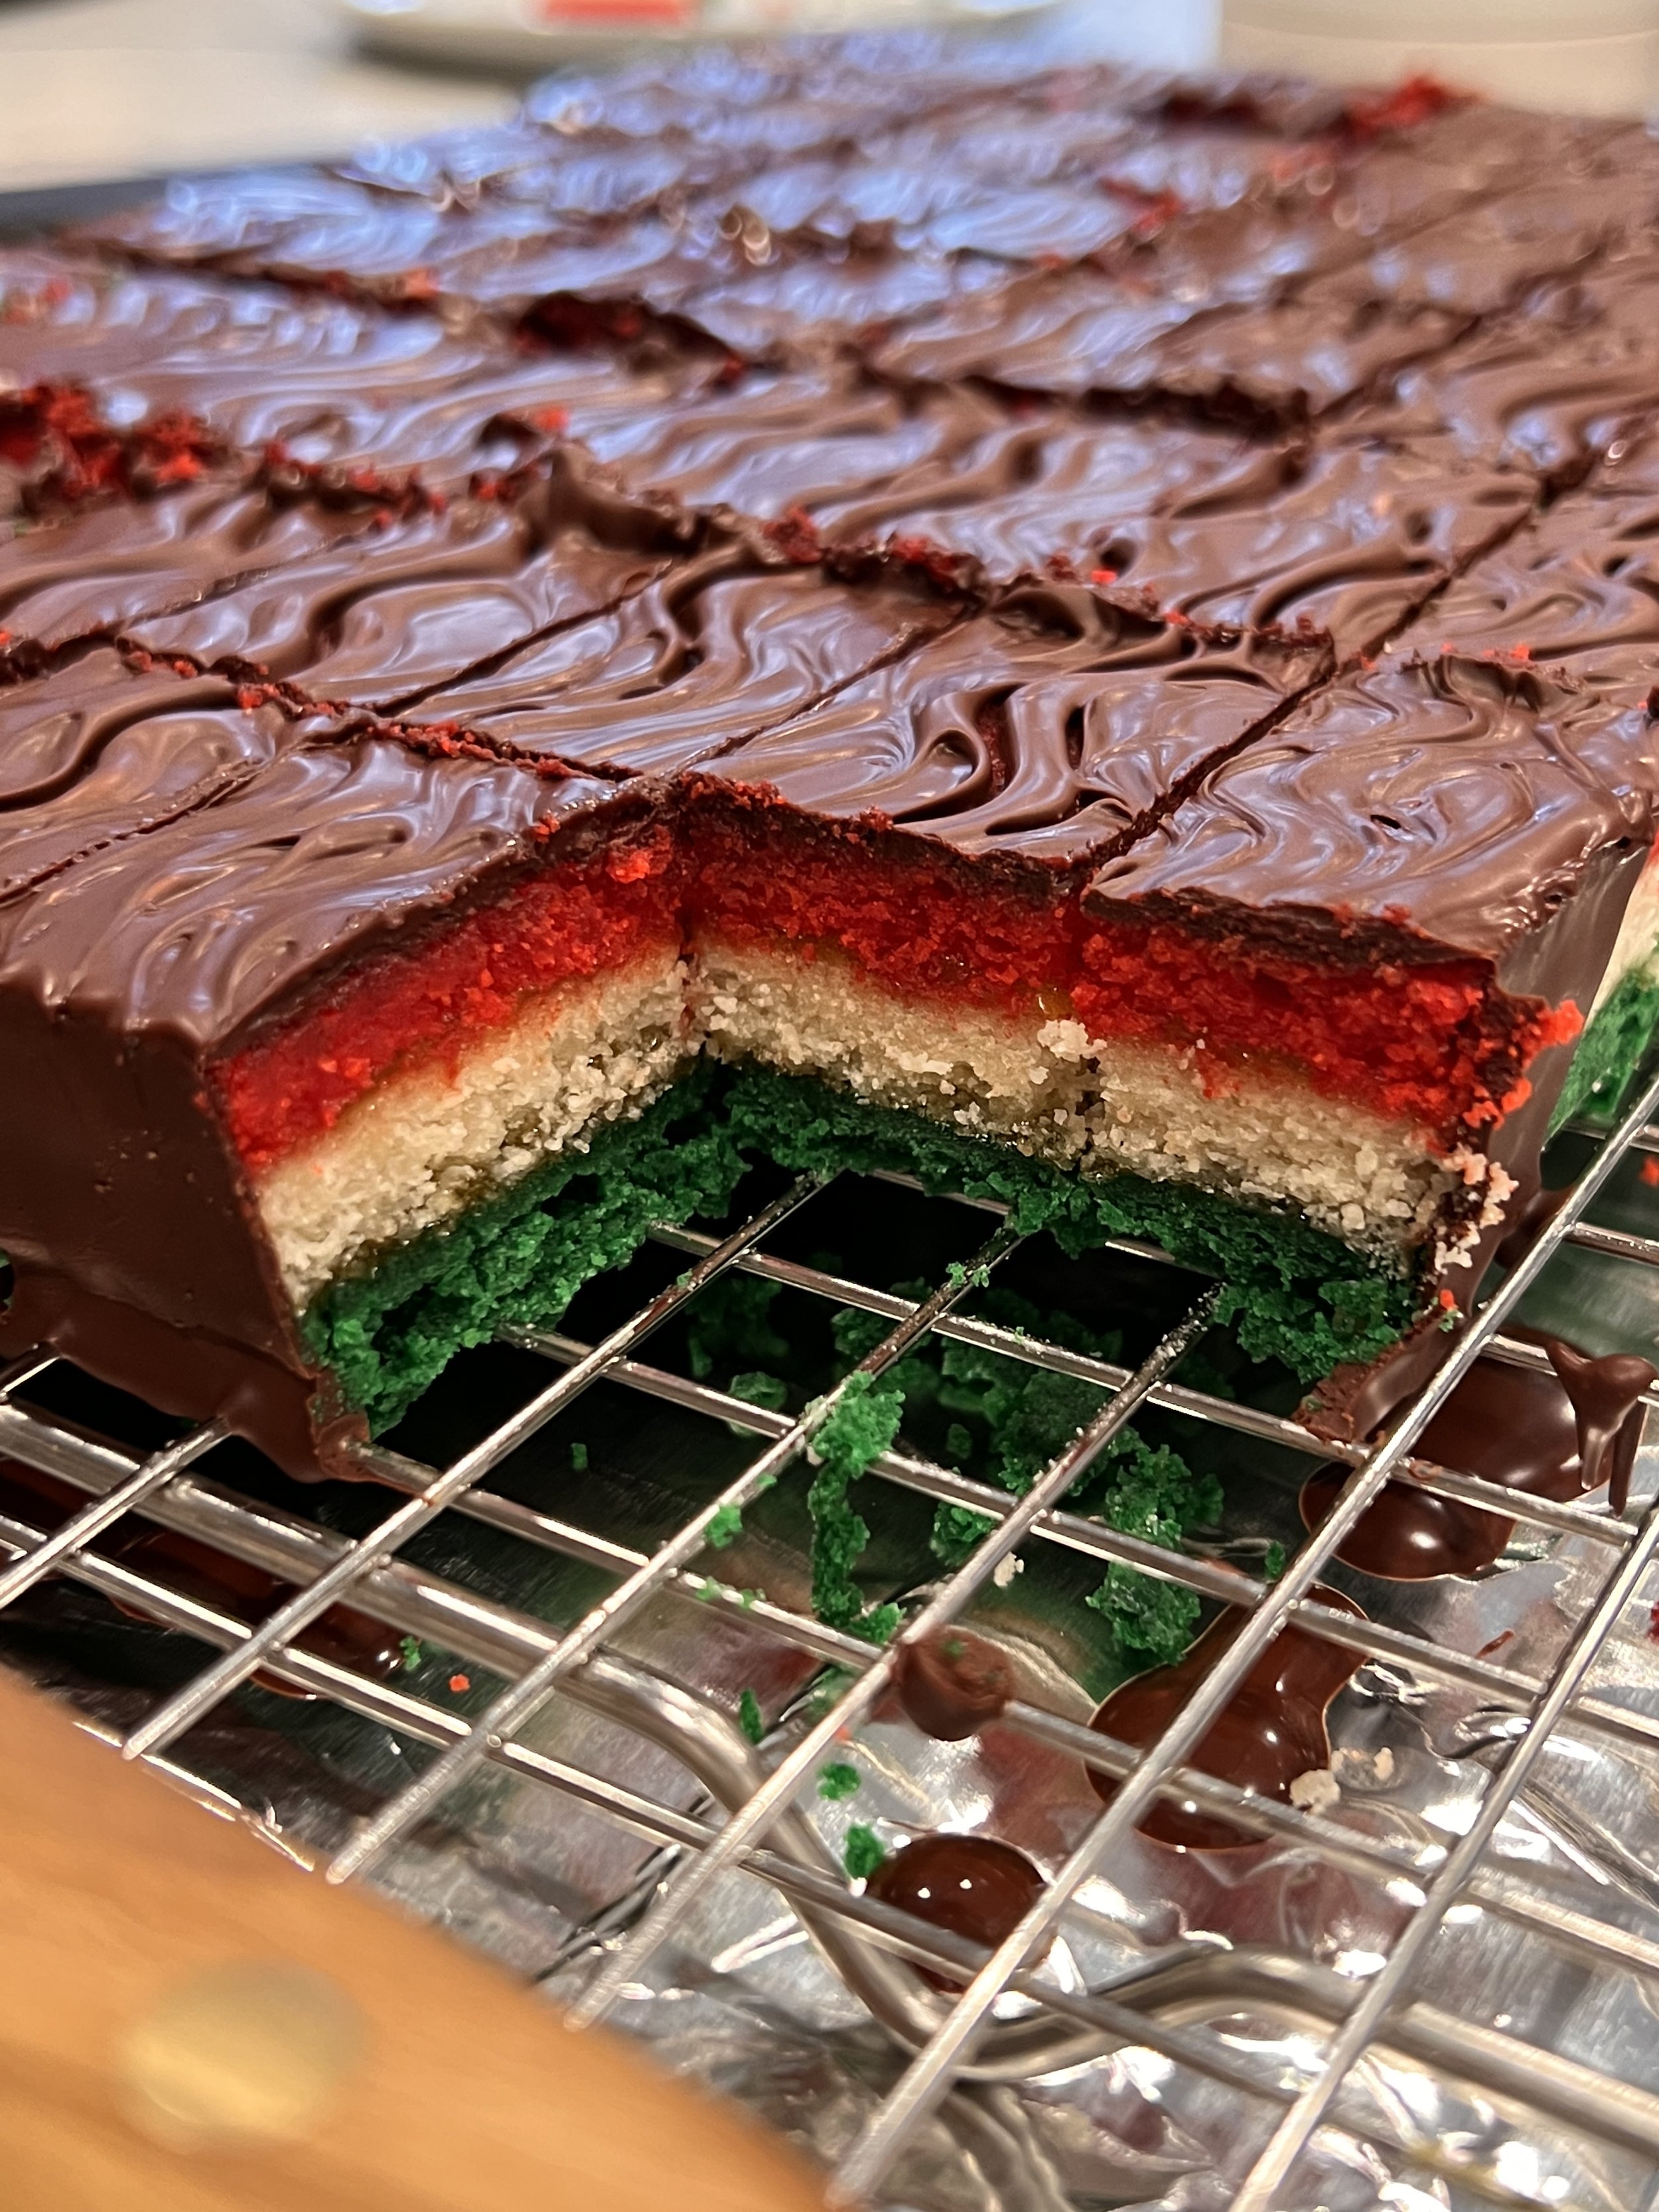
OK, enough of that tangent. These cookies always felt like some kind of magical, unattainable quest - they’re just so pretty with their pink, white, and green layers of super dense almond cake, with apricot or raspberry jam keeping them together, covered in bitter dark chocolate. The idea of making them never even crossed my mind until my mom posted a recipe on my facebook page a couple of years ago, but this is the first year I’m attempting them. And now I’m going to make them every year, because while you need patience to make them, they are not difficult. This isn’t for beginners, but if you’ve been baking a while and can make a merengue by hand, then you’re fine.
Ingredients:
2 1/2 sticks of room temperature, unsalted butter
8 oz. almond paste (not the sweetened pastry filling in the can, and not marzipan. Paste.)
1 cup of sugar
4 eggs, separated
1 teaspoon almond extract
2 cups flour
1 teaspoon kosher salt (I use Diamond Crystal Kosher Salt)
Green and Red gel food coloring
15 oz. of smooth, apricot jam
1 lb. bittersweet chocolate
2 tablespoons coconut oil
Kitchen tools that make life easier:
Stand mixer
Food processor
Large cutting board
Large, sharp, kitchen knife
Sifter
Digital scale
Rubber spatulas
Parchment paper
Cooling racks
Directions:
Butter and flour the jelly roll pans, and line the bottoms with parchment paper. Preheat your oven to 350 degrees F.
Make the layers.
Place a sheet of parchment paper on your counter, and sift the flour and salt onto it. Set aside.
In a food processor, add the almond paste and 3/4 cup of the sugar plus 2 tablespoons. It’s helpful if you break up the almond paste into smaller chunks, first. Pulse this mixture until you have a fine, sand-like texture (similar to how we start the pignoli cookies). You'll notice in my photos that I did not start with a food processor, and elected to do all this in the stand mixer. Chunks of almond paste flew around my kitchen, and my dogs swarmed. So don't do that - use the food processor.
Pour the almond paste/sugar mixture into the bowl of the stand mixer, and, on low-medium speed with the paddle attachment, begin to incorporate the butter. I’d say a couple tablespoons at a time. Once the butter is completely incorporated, put the speed up to medium/medium-high and whip for a minute or so until this is fluffy.
On medium speed, add the egg yolks, one at a time, followed by the almond extract. When mixed, whip this for another minute.
Pick up the parchment paper with the sifted flour and salt, and slowly pour it into the mixer on medium-low speed. The batter will be pretty thick. Make sure you’re stopping to scrape the sides of the bowl and the mixing blade as you go so that everything is well mixed.
In a separate bowl, whisk the egg whites until frothy, and then slowly add the remaining 2 tablespoons of sugar until you have stiff peaks. If you don’t want to do this by hand, you can switch to the whisk attachment on the stand mixer, but you have to switch bowls, and it’s a pain in the ass.
Remove the bowl from the stand mixer, and slowly fold in the egg whites, 1/3 at a time. The mixture will become a little fluffier/easier to work with, but not by much. When it’s fully incorporated, make sure you do a final scrape of the sides and the bottom to make sure you’ve got everything.
Here’s where the digital scale comes into play: we want to divide this batter into 3 equal portions, so that each layer is the same thickness. I placed the bowl that I whipped the egg whites in onto my digital scale, and zero’d it out. Then I scooped all the batter into that bowl to see exactly how much I had - it read 2 lbs. 11.5 oz. Math time! That equates to a total of 43.5 oz., which means that each third of the batter should be 14.5 oz. Note: this does not mean that your batter should be 14.5 oz. per third - eggs vary in size, so measure and convert this on your own. But it should be close.
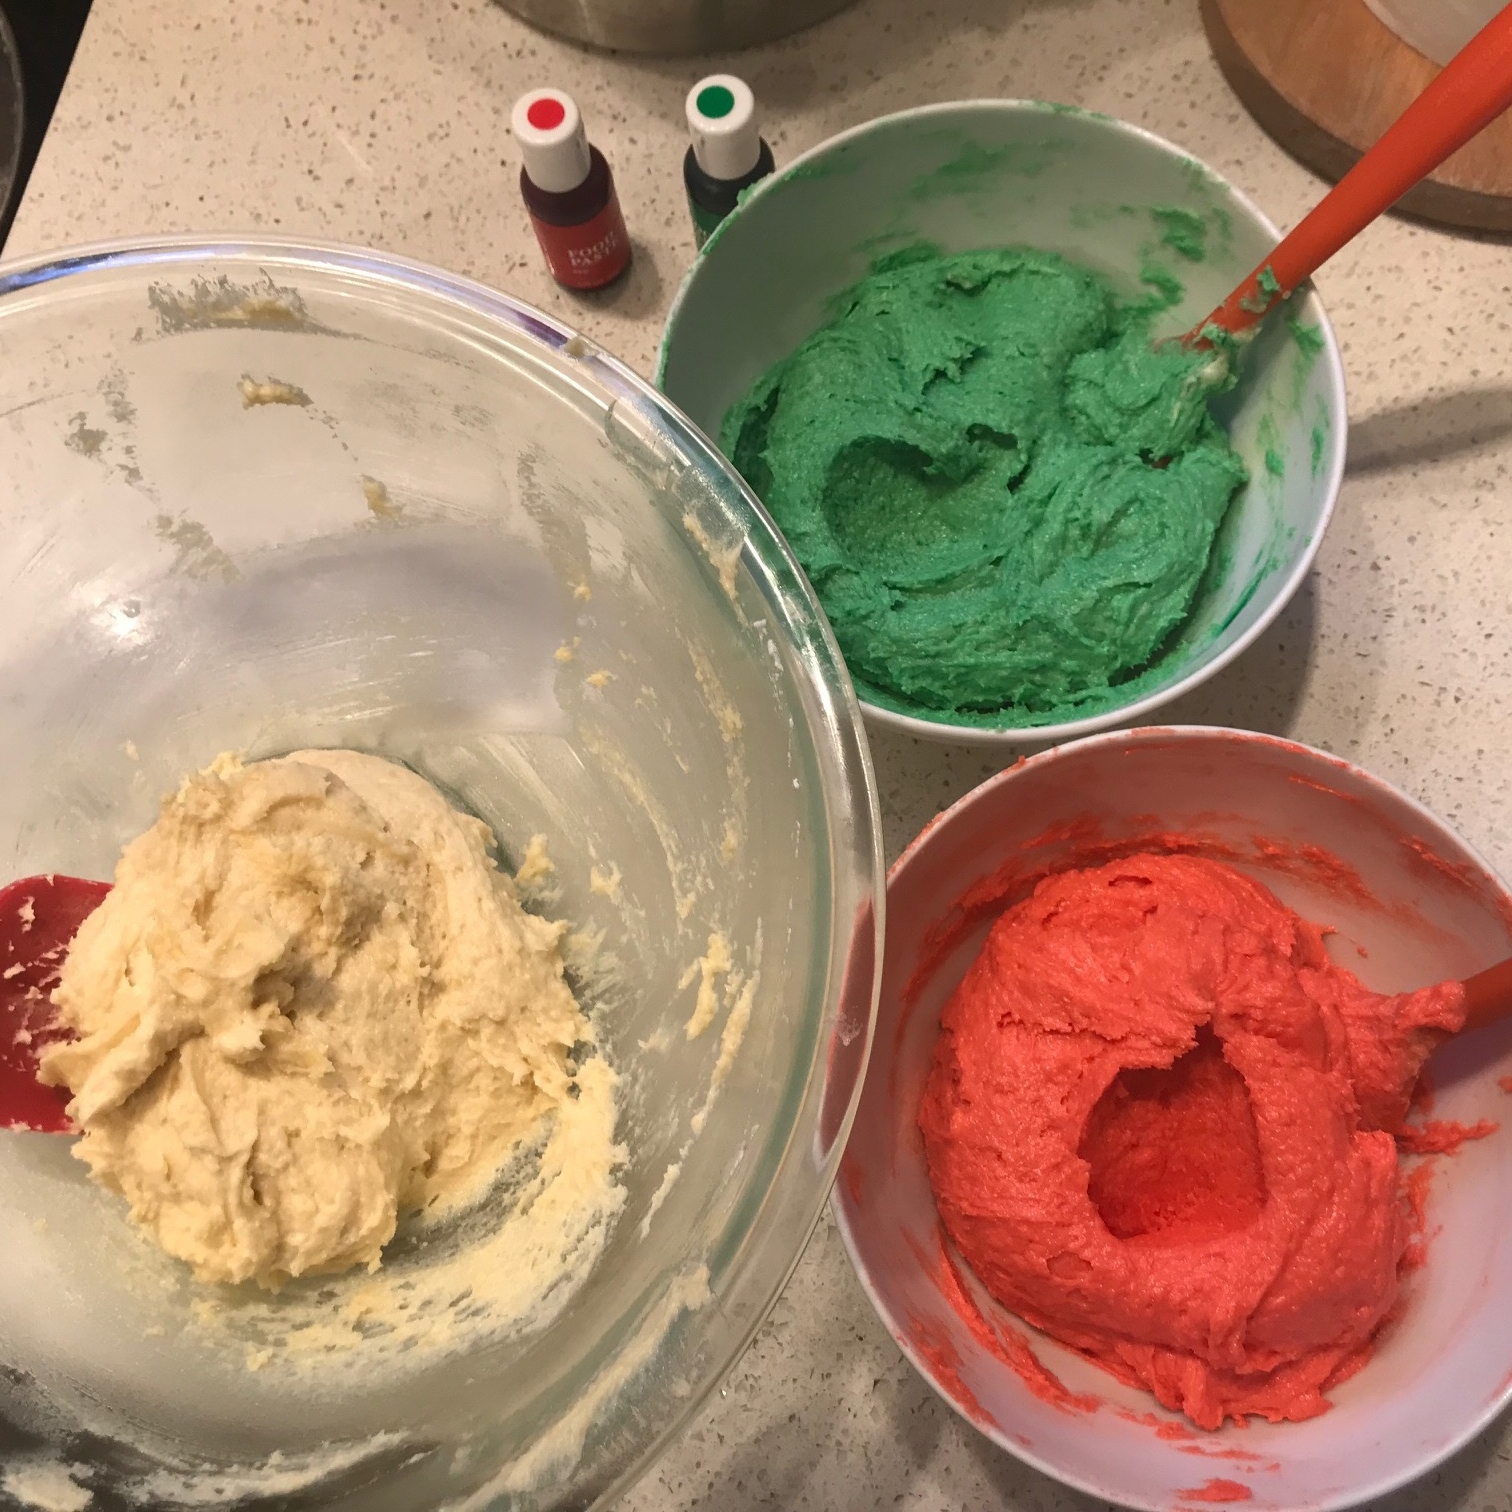
Measure 14.5 oz. of the batter into two small bowls, leaving the remaining batter in the larger bowl. Add red food coloring to one bowl, and green to another. Leave the third as it is. Mix the food coloring into each bowl thoroughly, but don’t over-mix and kill the merengue. It’s a dense cake, but it’s not crunchy. You can color the cake batter as light or dark as you’d like.
Pour each bowl of batter (or scoop, really, because it doesn't pour) into its own prepared jelly roll pan. Using the palette knife, spread the batter evenly so that it covers the entire pan, edge to edge. Yes, this takes a bit of time. Yes, this is a pain in the ass. Yes, the cakes are very thin. Be patient. If it's sticking pretty bad, spray the palette knife with cooking spray.
When all three cakes are ready, place them in the oven to bake for about 10 minutes, or until the white cake just starts to brown on the edges. I checked mine half way and rearranged them in the oven, just in case.
Pull them out and let them cool in the pans on racks to room temperature. Do not take them out of the pans.


Assemble the layers.
This part can be tricky, so I’ll do my best to explain it right.
Leaving it in the pan, spread half the jam onto the green layer.
Invert the white layer onto a cookie sheet, peel off the parchment paper, and slowly slide it onto the green layer. Spread the other half of the jam onto the white layer.
Invert the red layer, and slide it onto the white layer.
So, you should have one jelly pan that contains the following, starting from the bottom: green layer, jam, white layer, jam, red layer.
Place the cutting board on top of the entire thing, and flip it over so that the red side is the bottom layer on the cutting board. Remove the pan, and, leaving the parchment on the green layer, cover the entire thing in plastic wrap. Put one of the empty pans on top of the green layer, and put weights in the pan to press down on the layers (I used a case of La Croix).
Refrigerate for at least 4 hours, or overnight.
Summary: in your fridge, you have a cutting board with the following layers, starting from the bottom: red layer, jam, white layer, jam, green layer, parchment, plastic wrap, jelly roll pan, weights.


Finish the cookies.
Chop the chocolate and melt half of it in a double boiler with 2 tablespoons of coconut oil. Remove from heat, and stir in the remaining chocolate until it’s completely melted.
Take the layers out of the refrigerator and use the sharp kitchen knife to trim the sides so that they’re all even. Slide the entire thing, red side down, from the cutting board onto a cooling rack. Line a cookie sheet with wax paper or parchment, and put the cooling rack with the layers on top.
Pour the chocolate over the entire thing, using the palette knife to smooth it out and around all sides. It should be a thin layer of chocolate. The wax paper underneath will catch the excess chocolate.
When the chocolate has stopped dripping, use a large spatula to transfer the entire thing back to a cutting board. Using a fork, swirl a sort of chevron pattern into the top of the cookies. Then, let them rest for about 10-15 minutes, or until the chocolate has started to set, but not all the way. The reason we don’t let the chocolate set entirely is that it will crack when we slice it.
Use the sharp kitchen knife to slice the cookies into 1 1/2 x 1/2 inch rectangles. Ish. I didn't measure mine. It helps if you have a small kitchen towel soaked with hot water to wipe the blade with periodically.


You should end up with around 4-5 dozen slices, depending on their size, and depending on how many you shove into your mouth while slicing. After I was done slicing, I put them all back into the fridge, covered, overnight. These actually get better after a few days, so by Christmas they should be perfect.
Like I said - not difficult, but definitely requires a bit of patience - let me know how it goes. Enjoy!